epilogue: NEVER REALLY FINISHED

DECEMBER 2024 ISSUE

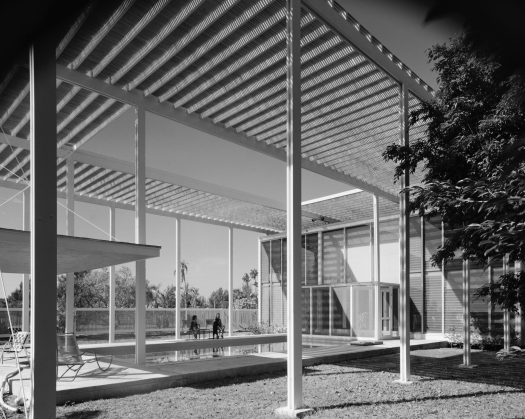
“Architecture is like frozen music, and the role of the photographer is to make it sing.”

            Ezra Stoller, Photographer

Early on, a vision of the architect’s project begins to jell. The design process is all about developing and documenting that vision so that it can ultimately be translated into built form. At least for me, the vision includes not only the building but its contents as well. In many cases, the owner develops a very different vision and furnishes the house in a way that taints the architect’s perceptions. (Perhaps another example of arrogance on the part of the architect, but it remains true)! This discrepancy in visions may explain why, in some cases, the architect chooses to photograph a project before it is furnished. In other cases, the visions are in closer alignment and the architect chooses to photograph the project after it is furnished. A well-appointed house enhances the architecture, and good photography can capture that. Great photography goes even further, by capturing the house’s underpinnings, or what Francis DK Ching calls “form, space, and order”.

Higher Perspective photograph of the dinky House

The contents within the house area referred to as FF&E (furniture, fixtures, and equipment) and are typically outside of the scope of the architect’s work. Owners and/or interior designers are the ones who normally deal with these things. I once heard FF&E explained this way: If you pick up a finished house, turn it upside down, and shake it, whatever falls out is the FF&E. The part you’re shaking is the architecture.

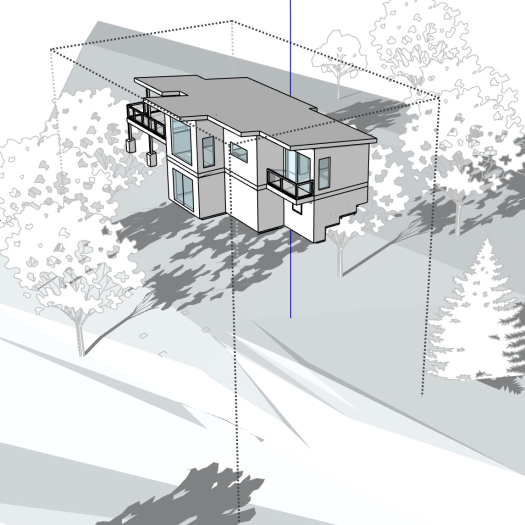
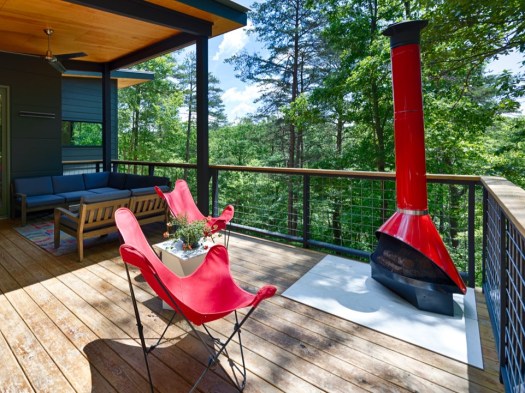
In the case of the dinky, most of the FF&E was new, since we didn’t move. We still live in the BirdHouse during the week. So, Susan and I (but mostly Susan) spent months collecting furniture and furnishings. We also seized the opportunity place a couple of classic pieces that had been gathering dust for decades. One was a fire-engine red funnel fireplace that Susan won in a raffle in the 70s, which was converted to a chiminea and now sits proudly on the deck. Another was a recently restored classic Dr.Pepper machine salvaged from my grandfather’s welding shop, for which I carved out a niche near the stair. I modeled these things and placed them, along with the other furniture, in my house model so we could visualize various options and scenarios. When designing any custom house it is important to make sure the furniture works. In a small and efficient house, it is especially important.

Dr. Pepper machine
fireplace

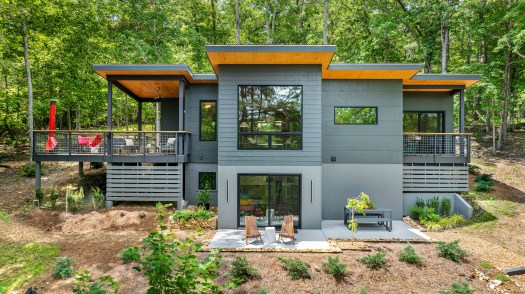
Assuming you want your house photographed, deciding when to do it is tricky. You will probably think “once it’s finished”, but when is that? I would contend that all projects, the dinky included, are never really finished. There is always a dangling punchlist item that was not checked off, or a piece of furniture to add, or some artwork to frame and hang. At some point, however; even though it’s not completely finished, it’s finished enough! At the dinky, that time was summer. I hired Urban Lens to photograph the interiors and Higher Perspective for drone shots of the exterior. We’re quite happy with the results. I think they show the house well, and give the viewer a pretty good sense of the spaces. Interestingly, they also make the house look larger than it really is, and than its name suggests. Ah, the magic of photography!

The kind of project that we originally embarked on may have reached a point where the house is photo-ready, but it will take more time for the site to reach the same point. In the last few months our focus has moved back toward site improvements. In addition to landscaping, we’ve been thinking about the benefits that a small carport would offer. Primarily it would provide shelter for an EV that Susan has been eyeing. It could also provide a convenient place to store yard tools. If sited at a lower elevation than the existing parking area, it would to allow a more accessible path to the dinky. What I’ve dubbed the dinkier carport is now in the preliminary design stage. I suspect that we’ll come up with other “necessary” improvements along the way. In other words, the dinky project is not really finished, and may never be!

THE dinky CHRONICLES, on the other hand, are finished!

dinkier Carport

BONUS Material:

I began THE dinky CHRONICLES in January of 2023. This, the final post, is being published in December of 2024. The design and construction, at least for our original scope of work, is now behind us. We have experienced weekend living in this cabin, on this site, in all four seasons. The verdict is out, and we love it!

As established in the initial issue of THE dinky CHRONICLES, Prequel: AN ORIGIN STORY, the dinky House is, at its core, a fishing cabin. The architecture of the dinky was inspired both by this function and by its river-focused site. The Little River is a wild river and the fish in it have not been stocked. They are native. The redeye bass, for example, have inhabited these waters for millennia. In short, they belong there. I catch them, appreciate them, and then I let them go. I want these beautiful and unique fish to remain for future inhabitants to the dinky – my grandchildren, and theirs.

A dinky bass out of the Little River.

design development: HOW IT WORKS

APRIL 2024, ISSUE 4

“Design is not just what it looks like and feels like. Design is how it works.”

-Steve Jobs, founder of Apple

I really appreciate this quote by Steve Jobs. His comment about design in general could be said of architecture specifically. It succinctly describes the first two phases of architectural service. If the schematic design phase determines “what it looks and feels like”, then the design development phase determines “how it works”.

In this post we’ll delve into how it works. Design development is the second of the five phases of service that architects typically provide. Using the dinky House as a case study, we’ll explore the architect’s process, or at least my process. In this phase we advance the plans, more precisely place the house on the site, select the primary building materials, and decide on the major building systems. My toolbox containing paper and pens is supplemented during this phase, and computer modeling is added.

space plan at the end of design development

I use the information gathered from the schematic design phase to produce a basic model of the house, and I gather whatever site information I have to build a basic model of the site. With that, I can more precisely locate the house on the site, as a 3d object on a 3d site. I can move and rotate the house to get it to both the right location and at the optimal elevation. Sometimes this is tweaked in the field but this technique yields pretty good results. In the case of the dinky house I commissioned a topo of the building area, as determined in the schematic design phase, made the models, and then played around with them for a while. There was a 75′ front yard setback imposed by the HOA. I also knew I had to work outside of the floodway, which extended to the dinky line. Otherwise, the placement of the house on the site was determined by architectural and logistical reasoning.

house to site placement

Architecturally I wanted the house to be of the hill, and not on the hill (FLW would be proud!), so I planted it in the bank of the hill. I positioned the house to gather the best views possible, short of clear cutting to the river. We were content with view corridors during the summers, until the fall begins to thin out the woods. But views are not everything. One of the cool things about the dinky site are the soothing sounds of the river rolling over the nearby shoals. So we positioned the house to maximize our sensory enjoyment of nature.

Logistically, the house needed to parallel the contours to minimize sitework. The contours suggested that the facade facing the river be oriented Southeast. Knowing that the best passive solar orientation would be South, I twisted it a bit to get it closer to South, while still straddling the contours. Easy access to the jobsite area, and later parking, was available on the north side. Utilities were also located on the north side, except that city sewer was not available. The logical place for a septic tank and drainfield was on the low-slope east portion of the site.

The house model is a great tool for exploring exterior materials. I typically like to mix a couple of different facade treatments. For cost and ease of maintenance it’s hard to beat fiber cement lap siding. So I began with that but I was not sure what to pair it with. After considering a lot of options, I decided to leave it open for the moment, to allow for additional study. (Sidenote: The design development phase advances the design, but it is not necessary to know everything about the materials and systems at this stage. It’s okay for some things to remain undecided, or even change, as the project develops.) The low sloped shed roof really called for a metal roof. I’ve always liked the corrugated metal roofs that cap so many rural barns, and decided to use it. The exposed structural components are painted wood. The deck boards, ceilings, and soffits are sealed wood.

Then there are the interior materials. As opposed to many cabins lined with heavy stained wood walls, I chose to use drywall. I have found that it can be a sculptural material that can also be light and airy. I did use some wood paneling but it is painted and used only in a couple of targeted locations. I’ve always liked strip oak wood floors and decided to use them throughout the main floor. Luxury vinyl tile is used throughout the lower floor for its durability and the variety of colors and patterns. The ceilings are a combination of drywall (mostly on the flat ceiling) and sealed plywood (mostly on sloped ceilings), providing continuity between the inside and the outside.

The structural systems is conventional for the most part, consisting of concrete footings, a basement floor slab, CMU basement walls, and wood framed floors and roofs . The walls however are SIPS, a sort of sandwich panel of sheathing and foam. When used with spray foam and rigid insulation board on the roof, these materials provide a very efficient thermal envelope. The heating and air conditioning design utilize high efficiency mini-splits, supplemented with an ERV/dehumidifier and exhaust fans to keep the air fresh in the tight thermal envelope. The plumbing system is conventional except that it feeds primarily WaterSense fixtures and fittings. Hot water heater is heated in a simple high efficiency tank and recirculated by a pump for “on demand” control. The electrical system is also fairly conventional, and powers a combination of LED light fixtures and ceiling fans.

systems exploration includes structural, HVAC, and electrical

Knowing what it looks and feels like, as well as how it works, we are now ready to advance to the next phase…..and the next blog post. Be on the lookout for – construction documents: BLUEPRINTS.

BONUS Material:

With commercial projects, Architects quarterback a whole team of professionals, including civil engineers, landscape architects, interior designers, structural engineers, mechanical (plumbing & HVAC) engineers, and electrical engineers. That is not the case for the average custom home. Architects often perform at least an abbreviated version of the tasks carried out by most of these design professionals. Sometimes an Owner will retain a landscape architect. or an interior designer, and sometimes an Architect will retain an engineer for a limited scope of work.

On the dinky project I was comfortable handling just about every task, with one exception – color selection. If you visit my current house, you may ascertain that my favorite color is white. I love the clean, crisp feel of white surfaces, as well as the play of shadow and light that white surfaces enhance. Susan too has a fondness for white……or so I thought, until she requested “a little color” both in and out at the dinky. I suddenly felt deficient. Fortunately I knew a couple of exceptional interior designers who had done a masterful job on a couple of the firm’s custom homes. So Susan and I worked with The Design Collaborative to select the right colors. They also had some great ideas pertaining to materials and textures, ideas which took the project to the next level. Thank you Heather and Hannah!

one of the color boards generated by TDC